Wednesday 3 December 2014

Padding Hair

Materials Needed:
- Padding (Tissue stuffed into tights)
- Pintail comb
- Grips
- Straighteners
- Crimpers
- Anchoring pins

How to:
1. Start by creating a middle parting.

2. Take a small section from the front of the hair on both sides. This will be frizzed using the anchoring pin technique with the straighteners.

3. Take a larger section behind the frizzed sections and crimp this. This will create more volume and texture to give the hairstyle height, structure, and stability.

4. With the left over sections of the hair, you will create French plaits. This will be where the padding will be anchored to keep it in place.

5. Once you have completed the French plaits, you can then pin the padding down with the anchoring pins. Pierce the pin through the tights and then back outwards to make sure it is tight to the model’s head.

6. Once they are secure, you can then pull the crimped hair over the top of the padding making sure it is not visible. You can then pin the crimped hair down to keep it in place.

7. You then do the same with the frizzed section of hair to give the end result more texture.


Timed Assessment - In the Role of the Hair Designer/Assesor

These images below are what my partner, Rachael created. She followed my step by step images and the instructions I clearly stated. These were in front of her whilst she created the hairstyle in the time given. Rachael turned up on time to this assessment and was prepared with the tools and materials needed to achieve the look properly. As Rachael progressed step by step, she made sure that I was comfortable in my seat and made me aware of what she was going to be doing every time she moved onto a different part of the hairstyle.

Her timing was good overall. She managed to get everything finished with extra time to touch anything up that needed to be. The extensions were one of the last materials added to the hair, and she did a great job of hiding them in my natural hair. This was helped also through my design as it was all being curled at the back so you could not differentiate the two (natural and extensions).

Rachael was sticking to the step by step which I feel helped her get through the assessment at ease. The heart shape was created well, although I feel it could have been a little more backcombed and messier.

There are a couple of other improvements I would have made if I were doing the hairstyle on myself. Firstly, Rachael had not ever practised this hair design on me beforehand therefore I had no confidence in her before the assessment as I did not know how aware she was of  timing, techniques and communication. This was another reason why I had changed my original design in the first place.

Rachael's backcombing technique did not seem to be working at times as she was not putting the comb right through the hair and back combing slowly and carefully. She seemed to be rushing it therefore the technique was not quite working. She soon picked up on that and changed the way in which she backcombed which seemed to improve it.The french plaits along the side of my head are not so visible in the photographs therefore I would have liked her to have made them a little bigger so they were more noticable. This would have helped to have shown off her own technical ability.

I changed my hair design last minute as I was so worried that my previous design would have been too technical for her. It involved a lot of French plaiting and I know Rachael was not that comfortable with that. If she had practised, I could have been there to encourage and make her feel more comfortable about completing my design. Next time, if a partner does not communicate with me, I will not change my design as this could potentially make my grade lower than it should have been.

Although I was very worried before the assessment, I am really pleased with the outcome and I think it worked in both my partner and my own favour of changing the hairstyle last minute. I feel the hair extensions were a great touch for creating a contemporary look.


Timed Assessment - In the Role of the Hair Artist

Here are the final photos from my Assessment. I was the hair artist for this and my partner Rachel designed the hairstyle. Unfortunately, Rachel turned up 30 minutes late to the assessment without a reasoning behind it. She then came in and was feeling very unwell. I had began to crimp her hair before she had to leave again due to illnesses.

It was a rather stressful day as I felt prepared and ready to get the assessment done so I did not have to worry. Then, I had to find myself a different model with a similar hair type, length and condition. This was proven rather difficult but I managed to find someone and ask politely if they would be my model in the afternoon. I was very thankful of this. Isabelle was now my model for the assessment but I followed Rachel's hair design and instructions.

It was quite nerve racking trying to complete a hairstyle on someone I had never practised on before, but fortunately I think it was rather successful.

It was quite difficult when it came to shaping the front of the hair as my new model had a lot more layers in her hair than my original model. I worked my way around this with a lot of backcombing on top of the crimping and then hair spraying the hair into place for more structure.

There was plaiting involved at the back of the head which had to reach across and be pinned without the pins showing. This was very hard as my new model had slightly shorter hair therefore the plaits only just reached diagonally across her head. It took me a couple of attempts until I was happy with the look.

I am so relieved I have finally completed the assessment for the hair as I was really quite worried about how the outcome would be as Rachel has been  very difficult to get in contact with throughout this project. I feel I may have enjoyed this project a whole lot more if I had been partnered with someone a little more reliable and committed.

Overall, I am rather proud of the outcome taking everything into consideration; last minute model change and lack of communication with my partner.


Modern Designers influenced by the Elizabethan Era

Here is a hair design created by Marc Jacobs. It looks very influenced by the Elizabethan for a couple of reasons. One of the reasons is the hair colour. It is a gorgeous auburn colour and this particular colour was very admired in the Elizabethan era - many women would wish they had hair just like Queen Elizabeth's.

Also, the curl/frizz which has been created. This is a very tame and structured version to the Elizabethan era which makes it a lot more contemporary. It also has symmetry like it would back in the Elizabethan era.

The next photo is by Alexander McQueen himself. This screams out contemporary Elizabethan to me, due to the height of the hair creating a slight heart shape yet it is sleek instead of frizzy or curly which makes it very modern looking. The plaiting right down the middle also relates back the era as having middle partings was a very popular hairstyle. Plaiting also was popular which adds to the Elizabethan feel, along with the hair colour. It is a great photo but I personally would not like that to be done to my own hair! I think it may have been created by using some type of wiring underneath the hair in order for it to keep it's height along with a lot of hair products. It is a very impressive and original look.

The following image is another one of Alexander Mcqueens. It is absolutely beautiful in my opinion; so simple yet elegant. It looks as though all of the hair has been neatly pin curled and all of the attention is brought to the 'cage' accessory over the model's head. It is absolutely gorgeous and represents the Elizabethan hair adornments perfectly with a contemporary twist on it. I would be really pleased with the outcome of that look if I had created it. The colouration of the hair with the accessory on top works really well together as the blonde hair colour does not stand out too much but it is still visible that techniques have been put into the style. The hair accessory reminds me to the caul's they used to wear which were made up of a fine fabric with a few pearls in it to make it a little more glamorous. This image has taken glamorous to a whole new level, I love it. The costuming is also beautiful and works really with the contemporary Elizabethan feel.

This last image is by Katarzyna Konieczka. It is a stunning image with a contemporary Elizabethan twist on it. I feel this shows especially through the hair and the blue dress. Blue is a very royal colour and reminds me of wealth and class; like Queen Elizabeth. The hair is very simple in this image yet I feel it is a very accentuated version of how a virgin Elizabethan would have had their hair styled. It is all very big and backcombed with a gorgeous length of locks.


Best Practices (no date). Best Practices. Available at: https://brandsbestpractices.files.wordpress.com (Accessed: 3 December 2014).


(no date). Vogue UK. Available at: http://www.vogue.co.uk/fashion/spring-summer-2011/ready-to-wear/marc-jacobs/backstage-photos/gallery/519036r (Accessed: 3 December 2014).

http://4.bp.blogspot.com/


Change of Final Design

This was a very last minute decision to help on behalf of my partner. I decided to take it upon myself to change and simplify my own hair design. This was so that my partner Rachael would feel more comfortable and at ease creating the look on the day of the timed assessment.

I did this because my partner messaged me in a tone of panic that she would not be able to create the look I had carefully designed. I am a little annoyed in having decided to change my design for the sake of my partner's abilities.

In the future, I will never do this again. I feel as though my design now does not show what techniques I am capable of but I hope this is taken into consideration. My partner never practised my hairstyle as she never attended classes when I was always punctual which is the reasoning behind changing my design so suddenly.

Rachael told me how she lacks in confidence when it comes to French plaiting so I completely took that out of the back of my hairstyle and only left two small French plaits on either side of my head. I felt she would hopefully be able to complete my hair design in time this way.

Again, I undoubtedly regret this decision of changing my hair design but I will know never to make that mistake again. After all, it was down to my partner  to commit to the project which unfortunately did not show for me.

This is now my final design. 


Final Design

Out of the three designs I created, I have chosen this design. I feel this hairstyle will show off my technical abilities as well as suit for a contemporary Eliabethan hairstyle. This is because this hairstyle incorporates lots of french plaiting and plaiting was very populur in the particular era I am focusing on. There is also an involvement of the heart shaped hair but without the frizz to give it more of a modernised feel to it.

Although the heart shape is messy and backcombed, it has great structure and will blend nicely into the french plaits as long as the pins are hidden away. As my hair is short too, I thought it would be best to stick to something close to the head to help avoid pins being shown and creating something challenging but manageable for a short hairstyle. I thought about going for a hairstyle with the hair down but I felt this would be too simple and it would not be a big enough challenge set myself and my partner.

I feel this look will be finished with the touch of the pearl headchain to give it the Elizabethan feel as well as the popularity of headchains in the era we are in now. They have become a thing of fashion for many young women.

My hair design is meant to be portraying a lady of the upper class with her hair all tight to her head. A lady of wealth and married to a rich gentleman. The updo shows this as women who were pure always had their hair down. The gold chain and pearls along the headchain are also a sign of wealth as these were very popular adornments to wear as an upper class lady of the era. The heigh of the backcombing is also to show her arrogance as she stands tall and proud with her big heart shaped hair at the front.

Practising Partners Design

Unfortunately, I found it proven difficult to ever get into much contact with my partner. The communication was very far and few between. It was only towards the end of this project that my partner even showed me any images of her design. I did not once get to practise on her real hair before the timed assessment which concerned me very much.

Due to the worry and concern of never practising on her, I took it upon myself to practise on my mannequin a number of times at home. I sent her images to make sure I was doing the correct techniques and the plaits and backcombing was all positioned the way she wanted it.

Thankfully, after one or two attempts Rachael's hair design, I felt at ease when it came to the assessment day. I had practised enough to feel confident in creating her hairstyle within a time limit and professional assessment conditions.

At home, I timed myself creating the hairstyle, and the quickest it took me was 35 minutes which I was very impressed with. This was without crimping the hair though as I could not supply any crimpers in the comfort of my own home. I took this into consideration when I was practising and added 20 minutes as a guideline of how long it would take me to crimp the front of Rachael's hair.

Here are a couple of images of me practising the hair design...


Three Hair Designs

First Design

My first design is inspired by Queen Elizabeth before marriage; innocence and purity. The curly hair without an updo represents this. As my hair is rather short, hair extensions will have to be added in order to create the hairstyle I am after. To give this more of a contemporary look, there is no frizz involved, the curls are created with a wand so there is more shape to the curls. Also, at the front of the head, the heart shapes do not include any padding as I have fine hair and it is difficult to hide them. A lot of backcombing would be involved for this hairstyle, with a finished 'messy' but well shaped look.A head chain is also put through the middle of the heart shape and sits symmetrically in the middle of the forehead. The chain at the back is then cut and hidden in with the curls so it blends in nicely to the hairstyle.

Second Design

This design does not require any other hair extensions or materials other than a few pearls to sit in the centre of the pincurls which would be created at the front of the hairline. This would give a solid hairline as they had it in the Elizabethan era. The front of the hair would then be backcombed and the remaining hair at the back of the head would then be plaited down the centre of the head and crimped at the ends to keep it in place. The left over hair would then be completely crimped and brushed out for a volumous frizzy look.

Third Design

My third hair design is very much in relation to the upper class of the Elizabethan era with the tight updo and heart shaped hair at the front. The front is heavily backcombed and pinned into place. The headchain is then placed in between the heart shape. The headchain is made up of a gold painted chain and pearls through it. Pearls were a very popular adornment in which Queen Elizabeth I wore in many of her portraits. This was a sign of purity and her wealth. Headchains are popular in this era therefore gives this hairstyle more of a modernised feel. The back of the head is completely french plaited which gives off the feel of elegance and class. In the Elizabethan era, this having a updo was also a sign of marriage and losing their virginity. In this era, this type of look could be great for a bride at her wedding.

Elizabethan Society

'The Elizabethan period saw a dramatic change in culture as England transitioned from the fiercely religious Middle Ages and into a more secular society that embraced science, politics, and art. The veils of the Medieval period signifying religious modesty were cast aside for the first time in England as young married women went about with their hair uncovered

Hairstyles of the Elizabethan era were characterized by high, frizzed hair and often placed over wires or pads to create a heart-shaped frame around the head.  These hairstyles were made easier when the first metal hairpins were invented in England in 1545.  The ideal hair was considered to be fair or red in colour and preferably naturally curly as inspired by the Queen herself.  Women would supplement their own hair with natural hairpieces sometimes rumored to have come from horses or even children’s hair.  Wigs became fashionable in the last quarter of the century, being first introduced to England around 1572.'

Elizabethan England Life (no date b). Elizabethan England Life. Available at: http://www.elizabethanenglandlife.com/a-trip-down-elizabethan-england-history-lane.html (Accessed: 4 December 2014).

In the Elizabethan era, it was considered any female should have their hair covered in some way or another as a way of hiding themselves. Therefore, hair coverings was a very important factor for women in this particular era. It would have seemed odd for any girl or lady to leave their home without their hair covered.

This became a huge part of fashion for female's in this era. Dependant on the type of hair coverings the women would wear, would determine their class in some way. For example, ladies of the upper class would be seen to be wearing expensive wigs, or even their own servants would arrange their hair with curls of some sort.


Elizabethan England Life (no date). Elizabethan England Life. Available at: http://www.elizabethanenglandlife.com/elizabethan-hats-for-women.html (Accessed: 4 December 2014).


Tuesday 2 December 2014

Harvard Referencing

I have realised these past number of weeks that I have not been Harvard Referencing, I have just simply been copy and pasting the web links in which I have found out information, research or images.

In the future, I will make sure to Harvard reference everything I find from the internet, books, magazine, newspapers etc.

It would be found very difficult to go back on the information I have found in the past therefore I will improve on this on the next project. I will make sure to do my research over the Christmas holidays to ensure that I know exactly how to Harvard reference.

I will also make sure I am confident in writing up a Bibliography.

Contemporary Elizabethan Hairstyles

Here are a few of the images which caught my eye in relation to contemporary Elizabethan hairstyles. The first one is the hair accessory made out of more hair which reminds of the 'caul' in which they used to wear over the hair. This is a beautiful version as it must have been made so delicately and I like the touch of pearls which have been added into it. It looks very classy and glamorous. It looks like something a bride could possibly wear to a wedding.

The second image I found is very different to the first, and makes much more of a bold statement. That is what I like about it; it stands out and highly reminds me of the Elizabethan look. It looks as though hair pieces have been added in to achieve this look with maybe some padding. The heart shape style gives off the impression of the Elizabethan era instantly and I like that it makes such a statement with the height, colour and plaiting gone through it.

I fell in love with the third image - wow. The whole image really wow's me; the makeup, hairstyle, and costuming. It all works so well together. I really like the weaved hair effect with the pin curls at the front of the hairline. It shows different techniques as well as the hairstyles that would have been worn in that era. There is also a slight heart shape in there too which of course represents the era.

http://media-cache-ec0.pinimg.com/
http://3.bp.blogspot.com/-


Friday 24 October 2014

Elizabethan Hair & Fashion


Queen Elizabeth


Queen Elizabeth I was a lady who dressed to impress; specifically in public. When she was by herself, she would only wear simple gowns. She would possibly wear them for more than two or three days in a row. In this era, the clothing worn was a symbolisation of the social status, therefore it was important for Elizabeth to always look her best. It was frowned upon for others to compete with Queen Elizabeth's style.

The colours black and white, were the Queen's favourite colours to wear, even though she had an array of different colours to choose from. They symbolized virginity and purity which is the reasoning for wearing those colours more often than not.

'The Queen's gowns would be gorgeously hand embroidered with all sorts of coloured thread, and decorated with diamonds, rubies, sapphires, and all kinds of jewels.

To complete her appearance, the Queen would wear accessories such as a fan, a pomander to ward of foul smells and it was thought infection, earrings, a diamond or pearl necklace, a brooch and a watch. Robert Dudley gave her a watch encased in a bracelet, the first known wrist watch in England. Like other women, she would also often wear a miniature Prayer Book attached to her girdle.'

Queen Elizabeth was known for wearing lots of makeup as she got older. This was due to catching small pox in 1562. Due to catching small pox, she would attempt to cover up any scars left on her face.

During this era, it was very difficult to keep their teeth clean and healthy, therefore many teeth rotted. Elizabeth had to unfortunately have a few teeth removed as she got older. To try and reduce the look of 'hollow cheeks', Elizabeth would stuff her mouth with small rags.

http://www.elizabethi.org/contents/wardrobe/

'Corset Hairstyle'

How to:

1. Create a straight middle parting down the centre of the head of hair using a comb.

2. French plait each side as tight and as neatly as you can.

3. Take a reasonably long piece of ribbon and pull it through (perhaps with a needle for guidance), from one plait to the other. Make sure there is an equal amount of ribbon on either side.

4. Take from one side of the ribbon and cross it downwards and across to the other side of the plait.

5. Repeat this with the other side of the ribbon and then alternate!

'Like all aristocratic Elizabethan women, the Queen would typically wear a chemise, a corset stiffened with wood or iron, a petticoat, a fathingale, stockings, a gown, sleeves, and a neck ruff and wrist ruffs. With the discovery of starch, ruffs became even more elaborate.'


Friday 17 October 2014

Curling and Frizzing

Materials Needed

- Straighteners
- Hair pins
- Sectioning clip
- Pintail comb


How to:1. Start off by sectioning the hair, with neat straight lines in the areas of the head in which you choose to create the curls.

2. Take a neat, small section of the hair. Pull all of the section through a pin. Make sure the pin is as close to the head as possible. If you would rather a smooth finish at the top of the head, lower the pin down the section of hair.
3. You then wrap the section of hair around the pin in a figure of 8. You start from the bottom of the pin and work your way up until all of the hair is wrapped around the pin.

4. You then secure the end with a pin so it does not all come out.

5. Once it is secure, use hot straighteners to press over the hair so that the heat sets the hair into the curl you have created.

6. Once the hair is cool, you can then take the hair out of the pin and you will end up with a 'zig zag' effect in the hair.

7. Repeat this method with as much hair as you like.

8. Once you have curled all of the hair you want, you can then start to pull the sections of hair apart to create a 'frizz' effect.

9. This frizz look can then incorporate with creating an Elizabethan hairstyle.


Tuesday 14 October 2014

Elizabethan Hair Adornments

My first project at University is all based on the Elizabethan era. We have to research the era ranging from makeup and hair, to the society and how the classes are divided. We are then bringing that era to the current era we are in now, and putting a contemporary twist on it and designing our own outlook on it. I'm really excited for this project (and I don't usually enjoy History)!

In this particular post, I'm going to talk about Elizabethan hairstyles. Here is a portrait of Queen Elizabeth I herself.

(no date). Available at: http://www.england-history.org/wordpress/wp-content/uploads/2012/10/elizabeth_11.jpg (Accessed: 4 December 2014).


There are a number of different hairstyles that the women and men popularised. It was all dependant on their social class too. Most hairstyles were extremely influenced by Queen Elizabeth herself. She was a noble, upper class lady therefore people of all classes looked up to her and her high fashion sense. Her fashion as well as hairstyles were highly elaborate and this was known as the 'Peacock age.' The upper class men were often dressed even more elaborate than the women. As Queen Elizabeth, her goal was to receive attention from her high fashion, and men of this era in the upper class also received almost just as much attention for their hair and fabulous beards.

'It was important for Queen Elizabeth to maintain her image and the beauty of a 'Virgin Queen'. The Elizabethan view of ideal beauty was a woman with light hair and a snow white complexion complimented with red cheeks and red lips. Queen Elizabeth achieved this picture of ideal beauty by using white make-up. This explains the odd white face make-up seen in many of her portraits. Queen Elizabeth had a natural red colour hair. This red hair look was emulated by many of the nobility of the Elizabethan era, as was the fair hair ideal of an ideal woman! An Upper Class Elizabethan woman followed this fashion further and might even dye her hair yellow with a mixture of saffron, cumin seed, celandine and oil!'

Elizabethan Hair Styles (no date b). Elizabethan Hair Styles. Available at: http://www.elizabethan-era.org.uk/elizabethan-hair-styles.htm (Accessed: 4 December 2014).

Men and women of the upper class wore ruffs or ruffles which framed their faces. Men of this era would usually have short hair, and a 'swept up' look for women. Before women were married, they would wear their hair down as a sign of virginity, or it was an ideal hairstyle for a bride on her wedding day. A bride of this era would cover her hair in flowers.

When a woman was married, their hair would mostly be covered by a variety of different head coverings. Usually the hair would be put up into a bun so that the head covering could easily be pinned on.

Fringes were never in fashion during this era, as it was popular to have a high forehead. Hairstyles were usually designed to compliment the style of the hat they would wear. Frizzy hair texture was also very popular as Queen Elizabeth I had this particular hair type. If women had straight hair, it would be accompanied by a middle parting with a French hood (usually).

Head Coverings
Most of the head coverings that were used in this era, were usually covered by jewels and many other accessories such as gold threads, and lace.

Coif - This was also known as the 'biggin' and was worn by all children in this era. It was a plain white linen material, and were usually worn to keep the hair in place, rather than a fashion statement. A close fitting cap was tied under the chin to keep it in place.

(no date b). Available at: http://media-cache-ec0.pinimg.com/236x/a8/d5/55/a8d555c19f79befd3328a7017dc191ab.jpg (Accessed: 4 December 2014).


French Hood - This head covering was introduced in the French Court, by Queen Elizabeth I's mother; Anne Boleyn. This particular head covering reminds me of an Alice band. It's a 'half moon' styled head band which slopes away from the face. The edges were usually decorated with jewels or pearls; also known as bilaments. A veil also covered the back of the hair.

http://4.bp.blogspot.com/


Atifet - This is very similar to the French Hood previously explained. The difference is that the front of this head covering is heart shaped. It also had laced trimmings added to it.


(no date d). Available at: http://trystancraft.com/costume/wp-content/uploads/2012/01/1580-Lady-FransPourbusOlder.jpg (Accessed: 4 December 2014).


Caul - The caul is an Elizabethan hair net. It is used to cover the back of the head, which was made of fabric. Sometimes, the fabric would be covered by netted chord. This was often decorated with spangles.

http://media-cache-ak0.pinimg.com/736x/12/3b/b7/123bb70783a909c5634d7dda0d618c93.jpg


Pillbox hat - This usually had a veil attached to the back of it.

http://media-cache-ec0.pinimg.com/236x/e6/be/d1/e6bed1148d17fa53d4bcddafc511f751.jpg


Thursday 9 October 2014

Plaits and Buns

Today, we were shown how to create plaits (French and fishtail), and how to create a bun without the donut. I was familiar with all of these techniques but it was nice to go over them and re-do them. I feel I have improved since I last did plaits and buns in college as I was never very confident within hair itself. Now, I feel I'm getting really involved and enjoying it a lot more already! Knowing this is only the start of my hair skills is very exciting to me. I cannot wait to prove to myself just how well I can do.

How to:
Plait- Take 3 sections of hair (as big or small as you like)
- Take one of the outside sections of hair and take it over the middle section.
- You then alternate and take from the other side and over the middle section again. (As shown in diagram). You must remember to keep tension when holding and crossing the hair over as it will look a lot neater when it is finished.
- You repeat this method all the way down the hair until a plait is formed.
- You can then keep this plait secure by back combing the ends slightly so that it doesn't fall out. An alternative is tying a hair band round the end. (http://hairstylingheaven.weebly.com/uploads/1/8/7/8/18789330/9656998_orig.jpg)

Here is a plait I created today!


Fishtail Plait- Grab 2 sections of hair
- Start on either the left or right section of hair. Grab a small section from one side and pull it over into the other section joining the hair together.
- You then alternate and take a small section from one side and cross it over to the other.
- Try not to have too much tension on the hair when creating a fishtail plait. They are fashionable to be fairy loose. It also means you can do more with them; stretch them to be messier and bigger.
- Repeat this method all the way down the hair until there is none left - you can then tie this hair with a band.

Here is a Fishtail Plait I created today!


French Plait- Start by separating the hair into three sections as if you were about to start a normal plait.
- Put all of the sections into one hand making sure they are still separated.
- You can now pull another small section of hair of hair from the right and add it to the right section of hair you already had hold of.
- Bring the section of hair you just added to and cross it over to the middle. Then, bring the middle section over to the right.
- Then, switch all of the sections into your right hand so that the left hand is free to use.
- Gather a section of hair from the left side of the head. Add this to the left strand
- Now, bring the left strand over to the middle and bring the middle section to the left. As you follow this method, try to keep your hands close to the head so the braid will be tight.
- Repeat this until there is no more hair left to add to the plait.
- You can then tie it with a hairband to finish.

(http://2good2lose.com/braid-french.shtml)

Here is a photo of my French plait from earlier on today.


Buns- Start by combing the hair into a tight, neat ponytail on the crown of the head.
- Gather the ponytail into 4 equal sections of hair.
- Comb out one section of hair so it is smooth and knot free.
- Hold the section of hair upright, and lightly backcomb the outer area of the section of hair (this will soon be hidden)
- Once backcombed enough for some extra volume and stability, you will then smooth out the other side of the hair with a comb (gently).
- After, you will then roll the section of hair (with the backcombed hair facing inwards), towards the hair band that is tied.
- This will then be pinned securely either side with two curvy grips.
- You repeat this with the other 3 sections of hair, making sure they are at an equal distance from one another.
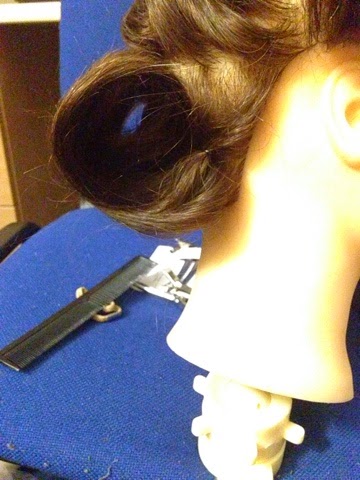
- After creating 4 neat rolls, you will then turn this into a bun!
- Using a grip, you will gently manipulate and manoeuvre the hair into the shape of a bun; round and even all the way around.
- Once you have done this, you will use the pins to secure it and make sure it keeps its shape.

Here are some photos of mine!