Plait- Take 3 sections of hair (as big or small as you like)
- Take one of the outside sections of hair and take it over the middle section.
- You then alternate and take from the other side and over the middle section again. (As shown in diagram). You must remember to keep tension when holding and crossing the hair over as it will look a lot neater when it is finished.
- You repeat this method all the way down the hair until a plait is formed.
- You can then keep this plait secure by back combing the ends slightly so that it doesn't fall out. An alternative is tying a hair band round the end. (http://hairstylingheaven.weebly.com/uploads/1/8/7/8/18789330/9656998_orig.jpg)
Here is a plait I created today!
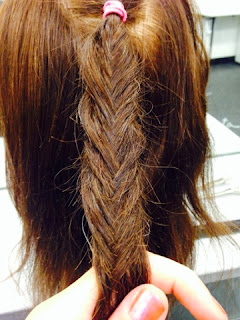
Fishtail Plait- Grab 2 sections of hair
- Start on either the left or right section of hair. Grab a small section from one side and pull it over into the other section joining the hair together.
- You then alternate and take a small section from one side and cross it over to the other.
- Try not to have too much tension on the hair when creating a fishtail plait. They are fashionable to be fairy loose. It also means you can do more with them; stretch them to be messier and bigger.
- Repeat this method all the way down the hair until there is none left - you can then tie this hair with a band.
Here is a Fishtail Plait I created today!
French Plait- Start by separating the hair into three sections as if you were about to start a normal plait.
- Put all of the sections into one hand making sure they are still separated.- You can now pull another small section of hair of hair from the right and add it to the right section of hair you already had hold of.
- Bring the section of hair you just added to and cross it over to the middle. Then, bring the middle section over to the right.
- Then, switch all of the sections into your right hand so that the left hand is free to use.
- Gather a section of hair from the left side of the head. Add this to the left strand
- Now, bring the left strand over to the middle and bring the middle section to the left. As you follow this method, try to keep your hands close to the head so the braid will be tight.
- Repeat this until there is no more hair left to add to the plait.
- You can then tie it with a hairband to finish.
(http://2good2lose.com/braid-french.shtml)
Here is a photo of my French plait from earlier on today.
Buns- Start by combing the hair into a tight, neat ponytail on the crown of the head.
- Gather the ponytail into 4 equal sections of hair.- Comb out one section of hair so it is smooth and knot free.
- Hold the section of hair upright, and lightly backcomb the outer area of the section of hair (this will soon be hidden)
- Once backcombed enough for some extra volume and stability, you will then smooth out the other side of the hair with a comb (gently).
- After, you will then roll the section of hair (with the backcombed hair facing inwards), towards the hair band that is tied.
- This will then be pinned securely either side with two curvy grips.
- You repeat this with the other 3 sections of hair, making sure they are at an equal distance from one another.
- After creating 4 neat rolls, you will then turn this into a bun!
- Using a grip, you will gently manipulate and manoeuvre the hair into the shape of a bun; round and even all the way around.
- Once you have done this, you will use the pins to secure it and make sure it keeps its shape.
Here are some photos of mine!


No comments:
Post a Comment