Friday 24 October 2014

Elizabethan Hair & Fashion


Queen Elizabeth


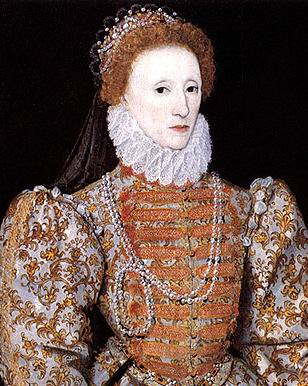
Queen Elizabeth I was a lady who dressed to impress; specifically in public. When she was by herself, she would only wear simple gowns. She would possibly wear them for more than two or three days in a row. In this era, the clothing worn was a symbolisation of the social status, therefore it was important for Elizabeth to always look her best. It was frowned upon for others to compete with Queen Elizabeth's style.

The colours black and white, were the Queen's favourite colours to wear, even though she had an array of different colours to choose from. They symbolized virginity and purity which is the reasoning for wearing those colours more often than not.

'The Queen's gowns would be gorgeously hand embroidered with all sorts of coloured thread, and decorated with diamonds, rubies, sapphires, and all kinds of jewels.

To complete her appearance, the Queen would wear accessories such as a fan, a pomander to ward of foul smells and it was thought infection, earrings, a diamond or pearl necklace, a brooch and a watch. Robert Dudley gave her a watch encased in a bracelet, the first known wrist watch in England. Like other women, she would also often wear a miniature Prayer Book attached to her girdle.'

Queen Elizabeth was known for wearing lots of makeup as she got older. This was due to catching small pox in 1562. Due to catching small pox, she would attempt to cover up any scars left on her face.

During this era, it was very difficult to keep their teeth clean and healthy, therefore many teeth rotted. Elizabeth had to unfortunately have a few teeth removed as she got older. To try and reduce the look of 'hollow cheeks', Elizabeth would stuff her mouth with small rags.

http://www.elizabethi.org/contents/wardrobe/

'Corset Hairstyle'

How to:

1. Create a straight middle parting down the centre of the head of hair using a comb.

2. French plait each side as tight and as neatly as you can.

3. Take a reasonably long piece of ribbon and pull it through (perhaps with a needle for guidance), from one plait to the other. Make sure there is an equal amount of ribbon on either side.

4. Take from one side of the ribbon and cross it downwards and across to the other side of the plait.

5. Repeat this with the other side of the ribbon and then alternate!

'Like all aristocratic Elizabethan women, the Queen would typically wear a chemise, a corset stiffened with wood or iron, a petticoat, a fathingale, stockings, a gown, sleeves, and a neck ruff and wrist ruffs. With the discovery of starch, ruffs became even more elaborate.'


Friday 17 October 2014

Curling and Frizzing

Materials Needed

- Straighteners
- Hair pins
- Sectioning clip
- Pintail comb


How to:1. Start off by sectioning the hair, with neat straight lines in the areas of the head in which you choose to create the curls.

2. Take a neat, small section of the hair. Pull all of the section through a pin. Make sure the pin is as close to the head as possible. If you would rather a smooth finish at the top of the head, lower the pin down the section of hair.
3. You then wrap the section of hair around the pin in a figure of 8. You start from the bottom of the pin and work your way up until all of the hair is wrapped around the pin.

4. You then secure the end with a pin so it does not all come out.

5. Once it is secure, use hot straighteners to press over the hair so that the heat sets the hair into the curl you have created.

6. Once the hair is cool, you can then take the hair out of the pin and you will end up with a 'zig zag' effect in the hair.

7. Repeat this method with as much hair as you like.

8. Once you have curled all of the hair you want, you can then start to pull the sections of hair apart to create a 'frizz' effect.

9. This frizz look can then incorporate with creating an Elizabethan hairstyle.


Tuesday 14 October 2014

Elizabethan Hair Adornments

My first project at University is all based on the Elizabethan era. We have to research the era ranging from makeup and hair, to the society and how the classes are divided. We are then bringing that era to the current era we are in now, and putting a contemporary twist on it and designing our own outlook on it. I'm really excited for this project (and I don't usually enjoy History)!

In this particular post, I'm going to talk about Elizabethan hairstyles. Here is a portrait of Queen Elizabeth I herself.

(no date). Available at: http://www.england-history.org/wordpress/wp-content/uploads/2012/10/elizabeth_11.jpg (Accessed: 4 December 2014).


There are a number of different hairstyles that the women and men popularised. It was all dependant on their social class too. Most hairstyles were extremely influenced by Queen Elizabeth herself. She was a noble, upper class lady therefore people of all classes looked up to her and her high fashion sense. Her fashion as well as hairstyles were highly elaborate and this was known as the 'Peacock age.' The upper class men were often dressed even more elaborate than the women. As Queen Elizabeth, her goal was to receive attention from her high fashion, and men of this era in the upper class also received almost just as much attention for their hair and fabulous beards.

'It was important for Queen Elizabeth to maintain her image and the beauty of a 'Virgin Queen'. The Elizabethan view of ideal beauty was a woman with light hair and a snow white complexion complimented with red cheeks and red lips. Queen Elizabeth achieved this picture of ideal beauty by using white make-up. This explains the odd white face make-up seen in many of her portraits. Queen Elizabeth had a natural red colour hair. This red hair look was emulated by many of the nobility of the Elizabethan era, as was the fair hair ideal of an ideal woman! An Upper Class Elizabethan woman followed this fashion further and might even dye her hair yellow with a mixture of saffron, cumin seed, celandine and oil!'

Elizabethan Hair Styles (no date b). Elizabethan Hair Styles. Available at: http://www.elizabethan-era.org.uk/elizabethan-hair-styles.htm (Accessed: 4 December 2014).

Men and women of the upper class wore ruffs or ruffles which framed their faces. Men of this era would usually have short hair, and a 'swept up' look for women. Before women were married, they would wear their hair down as a sign of virginity, or it was an ideal hairstyle for a bride on her wedding day. A bride of this era would cover her hair in flowers.

When a woman was married, their hair would mostly be covered by a variety of different head coverings. Usually the hair would be put up into a bun so that the head covering could easily be pinned on.

Fringes were never in fashion during this era, as it was popular to have a high forehead. Hairstyles were usually designed to compliment the style of the hat they would wear. Frizzy hair texture was also very popular as Queen Elizabeth I had this particular hair type. If women had straight hair, it would be accompanied by a middle parting with a French hood (usually).

Head Coverings
Most of the head coverings that were used in this era, were usually covered by jewels and many other accessories such as gold threads, and lace.

Coif - This was also known as the 'biggin' and was worn by all children in this era. It was a plain white linen material, and were usually worn to keep the hair in place, rather than a fashion statement. A close fitting cap was tied under the chin to keep it in place.

(no date b). Available at: http://media-cache-ec0.pinimg.com/236x/a8/d5/55/a8d555c19f79befd3328a7017dc191ab.jpg (Accessed: 4 December 2014).


French Hood - This head covering was introduced in the French Court, by Queen Elizabeth I's mother; Anne Boleyn. This particular head covering reminds me of an Alice band. It's a 'half moon' styled head band which slopes away from the face. The edges were usually decorated with jewels or pearls; also known as bilaments. A veil also covered the back of the hair.

http://4.bp.blogspot.com/


Atifet - This is very similar to the French Hood previously explained. The difference is that the front of this head covering is heart shaped. It also had laced trimmings added to it.


(no date d). Available at: http://trystancraft.com/costume/wp-content/uploads/2012/01/1580-Lady-FransPourbusOlder.jpg (Accessed: 4 December 2014).


Caul - The caul is an Elizabethan hair net. It is used to cover the back of the head, which was made of fabric. Sometimes, the fabric would be covered by netted chord. This was often decorated with spangles.

http://media-cache-ak0.pinimg.com/736x/12/3b/b7/123bb70783a909c5634d7dda0d618c93.jpg


Pillbox hat - This usually had a veil attached to the back of it.

http://media-cache-ec0.pinimg.com/236x/e6/be/d1/e6bed1148d17fa53d4bcddafc511f751.jpg


Thursday 9 October 2014

Plaits and Buns

Today, we were shown how to create plaits (French and fishtail), and how to create a bun without the donut. I was familiar with all of these techniques but it was nice to go over them and re-do them. I feel I have improved since I last did plaits and buns in college as I was never very confident within hair itself. Now, I feel I'm getting really involved and enjoying it a lot more already! Knowing this is only the start of my hair skills is very exciting to me. I cannot wait to prove to myself just how well I can do.

How to:
Plait- Take 3 sections of hair (as big or small as you like)
- Take one of the outside sections of hair and take it over the middle section.
- You then alternate and take from the other side and over the middle section again. (As shown in diagram). You must remember to keep tension when holding and crossing the hair over as it will look a lot neater when it is finished.
- You repeat this method all the way down the hair until a plait is formed.
- You can then keep this plait secure by back combing the ends slightly so that it doesn't fall out. An alternative is tying a hair band round the end. (http://hairstylingheaven.weebly.com/uploads/1/8/7/8/18789330/9656998_orig.jpg)

Here is a plait I created today!


Fishtail Plait- Grab 2 sections of hair
- Start on either the left or right section of hair. Grab a small section from one side and pull it over into the other section joining the hair together.
- You then alternate and take a small section from one side and cross it over to the other.
- Try not to have too much tension on the hair when creating a fishtail plait. They are fashionable to be fairy loose. It also means you can do more with them; stretch them to be messier and bigger.
- Repeat this method all the way down the hair until there is none left - you can then tie this hair with a band.

Here is a Fishtail Plait I created today!


French Plait- Start by separating the hair into three sections as if you were about to start a normal plait.
- Put all of the sections into one hand making sure they are still separated.
- You can now pull another small section of hair of hair from the right and add it to the right section of hair you already had hold of.
- Bring the section of hair you just added to and cross it over to the middle. Then, bring the middle section over to the right.
- Then, switch all of the sections into your right hand so that the left hand is free to use.
- Gather a section of hair from the left side of the head. Add this to the left strand
- Now, bring the left strand over to the middle and bring the middle section to the left. As you follow this method, try to keep your hands close to the head so the braid will be tight.
- Repeat this until there is no more hair left to add to the plait.
- You can then tie it with a hairband to finish.

(http://2good2lose.com/braid-french.shtml)

Here is a photo of my French plait from earlier on today.


Buns- Start by combing the hair into a tight, neat ponytail on the crown of the head.
- Gather the ponytail into 4 equal sections of hair.
- Comb out one section of hair so it is smooth and knot free.
- Hold the section of hair upright, and lightly backcomb the outer area of the section of hair (this will soon be hidden)
- Once backcombed enough for some extra volume and stability, you will then smooth out the other side of the hair with a comb (gently).
- After, you will then roll the section of hair (with the backcombed hair facing inwards), towards the hair band that is tied.
- This will then be pinned securely either side with two curvy grips.
- You repeat this with the other 3 sections of hair, making sure they are at an equal distance from one another.
- After creating 4 neat rolls, you will then turn this into a bun!
- Using a grip, you will gently manipulate and manoeuvre the hair into the shape of a bun; round and even all the way around.
- Once you have done this, you will use the pins to secure it and make sure it keeps its shape.

Here are some photos of mine!